
Notify.lk Integrates with Woocommerce enabling order update sending more easily.

Notify.LK now provides you a WooCommerce add-on to send SMS to your customers at any order status. No fancy options to set. Just enter your API credentials and you are good to go. You can read a simple guide on how to set up it in this article.

With our WooCommerce add-on, you can set options to send SMS to customers for Pending, Failed, Processing, Completed, On-Hold, Cancelled, Refunded events of customer orders.  In addition, you can turn ON admin alerts to receive an SMS to yourself when your WooCommerce store receives new order. The following guide will help you to understand how to install Notify.LK SMS integration to your already working WooCommerce store.

Installation

Download the plugin from our WordPress plugin repository. The file you are downloading is a WordPress plugin. It can be installed directly on your WordPress installation as a normal plugin installation. In case you don’t know how to install a WordPress plugin,

  1. Login to WordPress admin dashboard.
  2. Go to “Plugins => Add New”.
  3. Click “Upload Plugin” button at the top.
  4. Select the downloaded zip file, click “Install Now”.
  5. After the upload successful, click “Activate” to activate the plugin.

Setting up the plugin

After installing and activating the Notify.LK WooCommerce Addon plugin, you will see a new tab on the WooCommerce settings page.
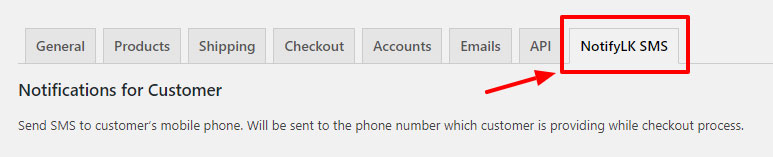
Notify.LK SMS Gateway - WooCommerce Options Tab
SMS Gateway – WooCommerce Options Tab

Go to the new tab “NotifyLK SMS” to begin setting up the options. First of all, scroll all the way bottom to find the “Notify.lk Settings” section which is where you need to connect your Notify.lk account to your website by entering a User ID and the API key.
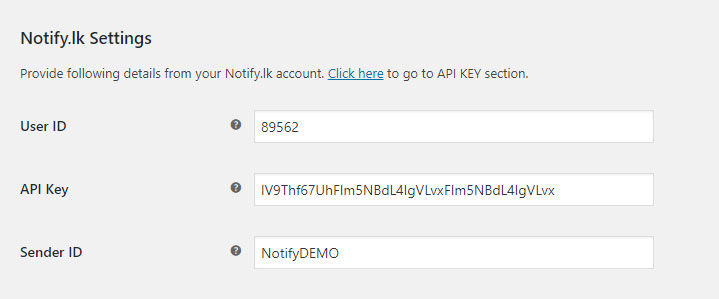
SMS Gateway - WooCommerce API Key section.
SMS Gateway – WooCommerce API Key Settings Section.

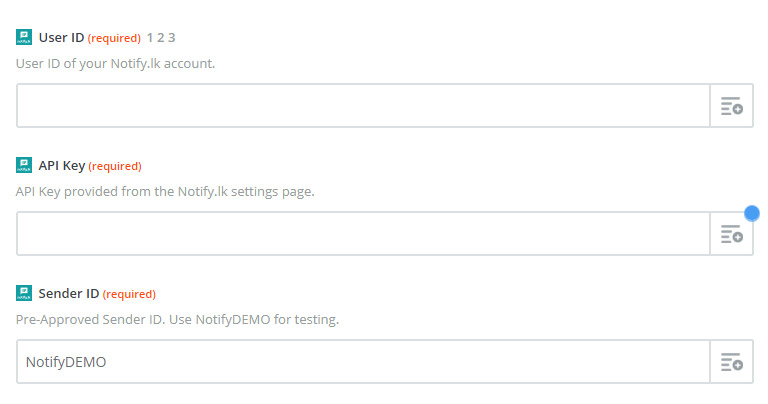
You can find User ID and API Key in your API keys page in Notify.lk settings section. And the Sender ID is your pre-approved sender ID. You can view your available sender IDs here in your Sender IDs page in the settings section. If you just registered and didn’t request a Sender ID, you can still send SMS using “NotifyDEMO” sender ID. Just enter it into the field.

Enabling SMS to Order Events

Now you have done the part of integrating your Notify.lk account to your WooCommerce addon. Now let’s configure your SMS options to ask the plugin to send SMS according to your requirement.
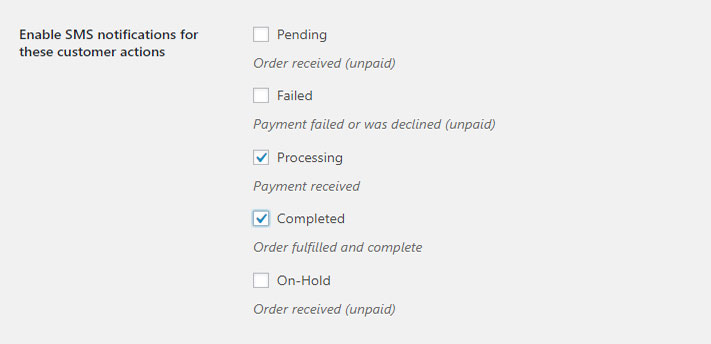
SMS Gateway – WooComerce Event Settings

Tick the appropriate event which you want customers to be alerted using SMS. To get a detailed description of these WooCommerce order statuses, read their article here.

Now, you have set the plugin to send alerts for several WooCommerce order events. Not only that, you can customize the text your customers are receiving. To do that use the section below.
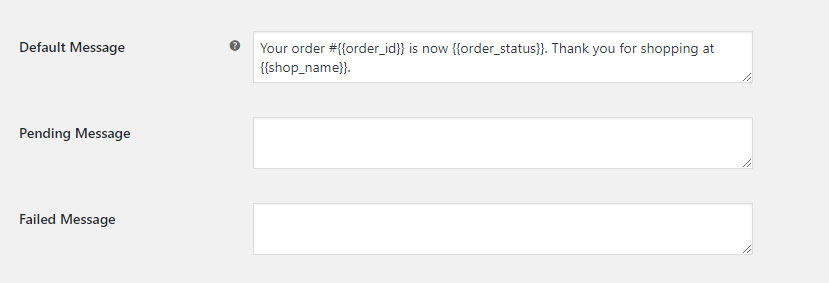
SMS Gateway - WooCommerce SMS Text
SMS Gateway – WooCommerce SMS Text

Default Message is the message users are receiving if the Message field for any event is empty. If you want to change the default text, just fill other fields below the Default Message field. You can use a set of shortcodes which the plugin will automatically convert into appropriate customer or order detail. We have listed the whole list of shortcodes available at the bottom of this page.

Admin Alert on New Orders

To enable admin notifications when a new order placed, use the “Notification for Admin” section. Just tick the enable checkbox and give the admin mobile number which you would like to receive the admin SMS alerts.
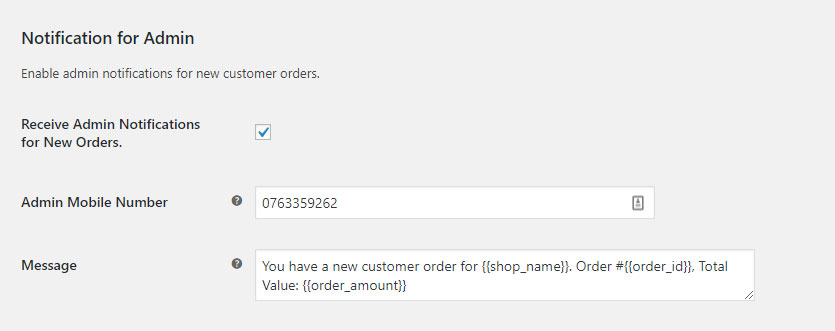
SMS Gateway - WooCommerce Admin Alerts
SMS Gateway – WooCommerce Admin Alerts

Finally, don’t forget to save this options page to keep the settings and things to work as you just opted by filling all above information.

This plugin is developed and maintained by Notift.lk team and you can review the code in our GitHub repository. If you are a developer and would like to contribute adding more features or improving current features, you are welcome to create a pull request. Or if you have any feedback or issues, you can simply contact our support team or create a GitHub issue with the detailed information about the matter.

Happy WooCommercing with Notify! 🙂

Integrate almost anything with our Zapier app

Now you can receive or send SMS for Sri Lanka also with Zapier events.

Notify.LK is a popular and the best web service while talking about a gateway to send SMS within Sri Lanka. We are providing some standalone plugins/add-ons for some application instances and coding languages. But there’s a chance, that you met a service or a platform that we don’t support a direct integration. Zapier is a web service comes handy in cases like that. Almost every platform/application has some sort of integration inside Zapier. While we have Notify.lk app in Zapier, now you can integrate our SMS API with a wide array of services and platforms.

As an example, you can integrate Gmail and Notify.LK to receive an SMS when your inbox receives an email. In another case, you can set up to send an automated SMS to your customers when they create a support ticket on your Zendesk or Freshdesk support desk. Following are some of the popular services you may integrate with Zapier.

How to integrate apps with Zapier

You may start integrating Notify.LK Zapier app by clicking here. You may start adding an action by “Choose a Trigger App” to select the action from another app as you creating a normal zap.

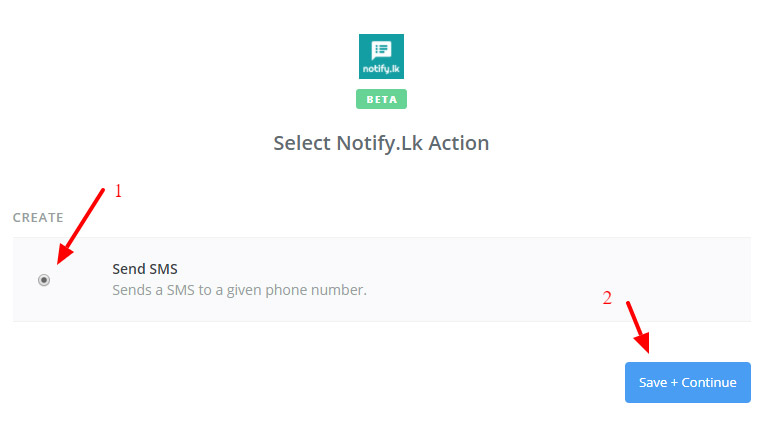
As the first step setting up Notify.lk, select the only option Send SMS and click Save + Continue button. After you click the button, you will be directed to the next step where you will have to provide Notify.lk API credentials. Fill all the required information. You may find your API credentials in the API Keys page.

After you fill this form, you are all good to test the integration. Please be sure to provide 100% accurate information so that it will work without any issues. If you have any issues while settings this up, you may contact Notify.lk support team from the support page.

Integration with WordPress Ninja Forms Plugin

SMS gateway API integration for Sri Lanka - Ninja Forms integration is now available

Notify.LK now has a plugin for WordPress integrating Notify.lk SMS service for Ninja Forms submissions. You may use Ninja Forms plugin and create forms with it and allow it to send SMS to the user who filled the form and/or to the admins of the website.

This plugin also comes with a custom phone number field with country flag selection. You may use it or a standard field comes with Ninja Forms plugin.

Installing and setting up the plugin

Download the plugin from the Github repository here. Install the downloaded zip file as a normal plugin on your WordPress website. After installing, go to Settings => Notify for Ninja page and save your API credentials correctly. That’s the only place where you need to provide API information.

Creating Forms with Automatic SMS

We are assuming that you already have Ninja Forms plugin installed on your website. Create your form according to your normal procedure. Please refer to Ninja Forms Documentation if you need instructions on how to create Ninja Forms.

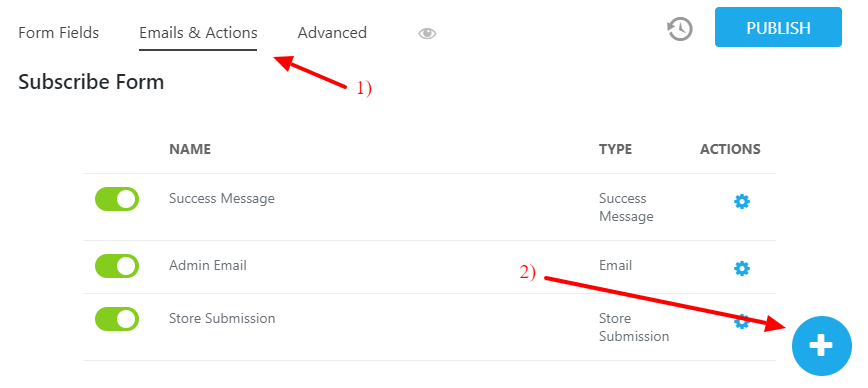
After creating your form, firstly go to Emails & Actions tab (shown in the below screenshot) to setup Notify.lk actions. And then click on the plus (+) button in the bottom-right to add a new action.

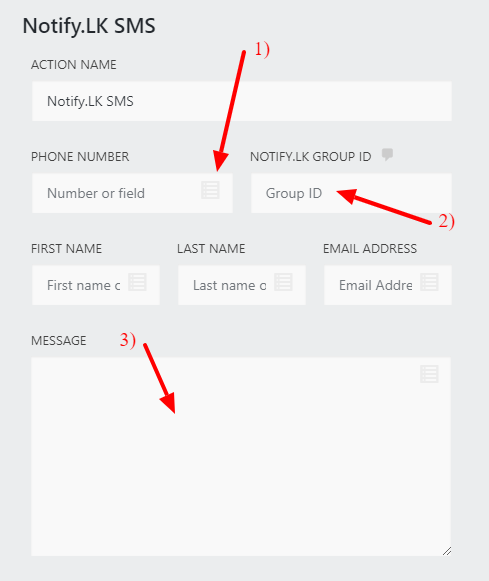
After clicking on the plus button, you will see many options to add form actions to the current form. You need to select “Notify.LK SMS” from the list of available actions. It will add your new action to the form and give you a form as shown below, to configure the action.

Phone Number field should be filled with the Field ID of the Ninja Form field which we are retrieving customer’s phone number. You may click on the icon shown in the arrow (1) to select the correct Field ID from a list of available fields.

Also, the Group ID field can be filled with an ID of any Contact Group from your Notify.lk account. By providing a contact group ID into that field, you can assign the contact you are saving or updating to the specified contact group.

First Name, Last Name, and Email Address fields are optional and you may provide them hard-coded or you can use a Field ID by clicking on the icon on them to retrieve a customer filled value for them. Those data will be filled to the contact you are saving or updating.

Arrow (3) is indicating the Message Field, you may use Field IDs there also to add any dynamic value from the customer filled data to your message text.

Phone Number and Message fields are required to fill for the integration to work. You may save the form after filling all the required information.

Testing the Integration

If you provide all information correctly, API information and form action settings, you should receive an SMS right after you fill the form. In case you also need to receive an SMS as an admin while customer receiving his message, you may add another action and fill your phone number to the Phone Number Field. In such cases, admin and the customer will receive the SMS individually according to configurations in both actions.

If you face any issues while integrating Ninja Forms with Notify.lk, you can simply write to us via our Support Page. We are avaialable to assist you in the process.